Complete the assignment and turn it in to D2L by 11:59pm on Sunday, February 23.
Homework 2: Image Processing using OMP
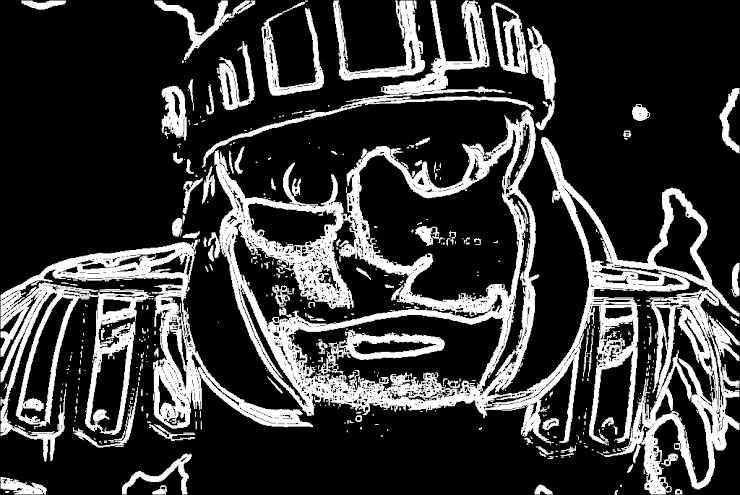
In this assignment, you are going to modify and improve the processing speed of an edge detector for grayscale PNG images. Edge detection is an image processing technique to find boundaries of objects in images. Here is an example image and the detected edges:
Note: this homework was motivated and adapted from: https://web.stanford.edu/class/cs315b/assignment1.html
 |  |
The files necessary for this assignment are found in a zip folder titled “HW2_edge_detection.zip”. To turn in this assignment you must upload all files to D2L. Use the following instructions:
✅ DO THIS: Upload the code files to you HPCC account and make sure you can compile and run the software. Note, this program uses the libpng library which is already installed on the HPCC.
Download the Edge_Detection repository repository from the “Homework Files” section on D2L under “Content”. Once downloaded, add it to your course Github repository.
Pull your updated repository with the “Edge Detection” folder to your account on the HPCC.
From a command line move into the repository and run the following commands to verify the code is working:
To complete the assignment, submit all files to the D2L submission box by 11:59pm on Sunday, February 23
Note: if for any reason you can not figure out git, please review the git tutorial and go to your instructors office hours.
Goals for this assignment:
By the end of this assignment, you should be able to:
Code Description and Background
There are lots of edge detection algorithms but in this assignment, you will work on an algorithm with the following three steps:
Image Smoothing
Gradient calculation (Sobel Filters)
Edge Thresholding
The following section describes each step in detail.
Step 2: Gradient calculation (Sobel Filter)
Assuming that each object consists of pixels that do not greatly vary in their brightness, the edges in an image are from the sudden changes of brightness in the pixels. One way to measure how big the change is to calculate the gradient magnitude at each pixel. The gradient operator we are going to use in this assignment is Sobel operator. Sobel operator is based on the following two 3x3 filters, which calculate x and y component of the gradient, respectively:
\[\begin{split} G_x =
\left[
\begin{matrix}
-1 & 0 & 1 \\
-2 & 0 & 2 \\
-1 & 0 & 1
\end{matrix}
\right]
G_y =
\left[
\begin{matrix}
1 & 2 & 1 \\
0 & 0 & 0 \\
-1 & -2 & -1
\end{matrix}
\right]
\end{split}\]
Here is a code snip-it that creates the filters:
//Sobel Filters
double xfilter[3][3];
double yfilter[3][3];
xfilter[0][0] = -1;
xfilter[1][0] = -2;
xfilter[2][0] = -1;
xfilter[0][1] = 0;
xfilter[1][1] = 0;
xfilter[2][1] = 0;
xfilter[0][2] = 1;
xfilter[1][2] = 2;
xfilter[2][2] = 1;
for(int i=0;i<3;i++)
for(int j=0;j<3;j++)
yfilter[j][i] = xfilter[i][j];
Once x and y components of the gradient is computed, the magnitude can be computed by:
\[IMG_{Gradient} = \sqrt{G_x^2 + G_y^2}\]
// Gradient Filter
for(int c=1;c<sz.width-1;c++)
for(int r=1;r<sz.height-1;r++)
{
double Gx = 0;
double Gy = 0;
for(int cw=0; cw<3; cw++)
for(int rw=0; rw<3; rw++)
{
Gx += ((double) output[r+rw-1][c+cw-1])*xfilter[rw][cw];
Gy += ((double) output[r+rw-1][c+cw-1])*yfilter[rw][cw];
}
g_img[r][c] = sqrt(Gx*Gx+Gy*Gy);
}
Step 3: Edge Thresholding
The last step in the code provided is edge thresholding. In this case, edges are defined based on the gradient image (\(IMG_{Gradient}\)). Values over the threshold are considered edges and vales under the threshold are not edges.
\[IMG_{Edge} = IMG_{Gradient} > thresh\]
The threshold (thresh) may be varied to get different results. For the images provided set the threshold to be 50.
// Thresholding
for(int c=0;c<sz.width;c++)
for(int r=0;r<sz.height;r++)
if (g_img[r][c] > thresh)
output[r][c] = 255;
else
output[r][c] = 0;
Homework Assignment
For this assignment you will do the following parts:
Establish Serial Benchmark
Optimize the Serial Code using compiler options
Modify the code to use OpenMP loops
Final Report
Deliverables
Part 1: Establish Serial Benchmark
✅ DO THIS: Benchmark the code provided using the image files provided in the images directory. This file should provide a solid baseline. Make sure you explicitly describe the hardware you ran on and run enough trials to account for hardware and system variation.
Part 2: Optimize the Serial Code using compiler options
The code provided is not optimized very well. There are lots of things that could be done to speed up the existing code. For this homework I would like you try and benchmark two optimizations:
Use different levels of compiler optimization
Change the order of the loops (row and column) for the Average Filter, Gradient Filter and Edge Thresholding. See if the change in order will increase speed due to multiple cache hits.
✅ DO THIS: Make the updates to the serial code as described above. Benchmark and compare the time differences between the original version, the modified versions. Pick the changes that provide for the fastest code. Make all comparisons on the same hardware as Part #1. If possible provide a detailed table or graph to show the differences.
Make sure you also save a version of your best serial code to turn in.
Part 3: Modify the code to use OpenMP loops
✅ DO THIS: Rewrite the code to use OpenMP loops to run the Average Filter, Gradient Filter and Edge Thresholding in parallel. Make sure you carefully note the types of changes you make and use proper synchronization. Benchmark your changes with different OMP Loop Scheduling options and compare to the serial benchmarks.
OMP Loop Scheduling Options
Watch the following video which talks about ways to play around with schedulign options:
schedule(static [,chunk]) Deal-out blocks of interations of size “chunk” to each thread
schedule(dynamic[,chunk]) Each thread grabs “chunk” Iterations off a queue until all iterations have been handeled.
schedule(guided[,chunk]) Threads dynamically grab blocks of iterations. The size of the block starts large and shrinks down to size “chnunk” as the calculation proceeds.
schedule(runtime) Schedule and chunk size taken from OMP_SCHEDULE enviornment variable (or the runtime library).
schedule(auto) Schedule is left up to the runtime to choose (does not have to be any of the above).
Part 4: Final Report
✅ DO THIS: Write a report describing what you learned (There is a template in the instructor’s git repository). This report should be in the form of a narrative (story). Start by describing how the provided serial code performed and what you did to accurately measure that performance. Then talk about what you did to optimize the serial performance. Finally, describe what you did to add in OpenMP and how the different scheduling options changed the speed of the algorithm. Make sure you include well labeled graphs of all of your benchmarking data and explain the graphs in your report text with a focus on any odd results you may see. Conclude with a general lessons learned.
This is an image algorithm. You should include example images.
Grayscale PNG images
The code provided is desinged to work only with grayscale *.png images. Most PNG images are color and many images are in different formats (ex. TIFF, jpeg). Fortunatly there is an easy to use command called convert which comes with the ImageMagick Library. Feel free to download and install the software for your own use or use the software already installed on the HPCC. The following examples can be used on the HPCC to load ImageMagick into your PATH, download an image from the internet and convert the image to a grayscale PNG file:
module load ImageMagick
wget https://c1.staticflickr.com/7/6118/6369769483_882a704a38_b.jpg
convert -colorspace Gray 6369769483_882a704a38_b.jpg MSUStadium.png
Part 5: Deliverables
✅ DO THIS: Prepare your files for the instructor. I recommend having three versions of the code; original serial version, optimized serial version, optimized OMP version. Update the provided Makefile to build all three executables. The files should include.
When you are done, add/commit and push all of your changes to your forked git repository. Your instructor will use the following command to compile and test your code on the HPCC:
make clean
make
make test
Watch the following videos for some hints to help streamline your code and benchmarking process:
✅ DO THIS: Environment Variables in OpenMP Introduction to OpenMP: 11 part 4 Module 6
Part 6: Optional Bonus (5 Bonus Points)
✅ DO THIS: Create an updated version of the Edge detector which includes some improvement. For example:
Use a median or Gaussian filter instead of the average filter.
Use Non-maximum suppression instead of thresholding.
Learn more about the above options here or pick be creative and try to make something else.
Make sure the updated code also runs using OpenMP and include it in your Makefile with deliverables. Include the improved edge detection examples in your report.
Here is a short video about Median Filters.
